Kali Linux (previously BackTrack) is an open-source Linux distribution created and supported by Offensive Security.
It’s essentially an ethical hacker’s ideal operating system, as it has the majority of the tools you’ll ever need. This OS has it all, from Metasploit to JohntheRipper to the one and only Aircrack-ng. But enough with the history.
Cybersecurity experts and fans like Kali Linux, a strong and adaptable penetration testing platform. It can be a fascinating experience to install Kali Linux on your computer because it gives you access to a variety of security tools and features.
Let’s get started and see how to install Kali Linux on your computer.
Requirements:-
Before we continue, you should be aware that this is the process for installing on the bare system itself, and you should proceed with caution. If you want to dual boot your machine, you must partition your hard drive and install Kali on that partition.
You’ll need the following components to complete this masterpiece:
1. A computer (minimum requirements: 20GB hard disk space, 2GB RAM, and an Intel Core i3 or AMD E1 processor)
2. A USB stick (6 GB or greater)
3. Rufus (to generate a bootable drive) A Kali.iso file
How to Install Kali Linux on Your Computer – Step by Step
Step 1: Download the Kali Linux ISO file
Go to kali.org and hit the download button.
You’re attempting to obtain an iso file, which is simply a method of packaging software. Operating systems are typically packaged in this manner (along with malicious software, so be cautious where you obtain them).
Step 2: Create a bootable drive using Refus
Rufus can be downloaded from rufus.ie.
To make the stick bootable, we will use Rufus and make a few adjustments. Connect the stick and choose it from the ‘Device’ menu. Select your newly downloaded Kali iso file under ‘Boot selection. Now comes the difficult part.
If the computer is ancient or has a legacy BIOS, select MBR. Choose GPT if the computer is newer and has a UEFI BIOS.
Press the Start Button and wait for the image to be written to the stick (this takes some time, so be patient).
To boot the computer from the new Kali USB stick, make sure secure boot is disabled in the BIOS settings.
Step 3: Begin the installation
To begin your installation, boot from your installation medium of choice. The Kali Linux Boot screen should be displayed. Select between Graphical or Textual installation. In this case, we went with the Graphical installation.

Choose your language of preference. This will be needed both throughout the installation process and once you start using Kali Linux.

Indicate your geographic location.

Choose your keyboard layout.

The setup will now explore your network interfaces, look for a DHCP service, and prompt you to input your system’s hostname. In the following example, we’ve used kali as our hostname.

You can optionally specify a default domain name for this system to use (values can be brought in from DHCP or if an existing operating system is present).

Next, create a system user account (full name, username, and a secure password).


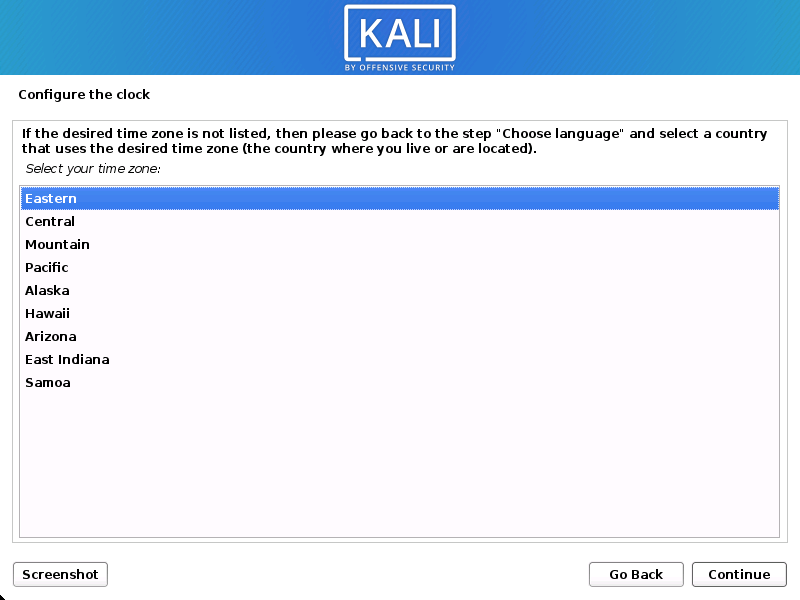
Next, Set your time zone.

Depending on the setup, the installer will now probe your drives and present you with several options.
Because we are using a clean disk in our guide, we have four possibilities to choose from. We’ll go with Guided – the entire disk because this is a single boot installation of Kali Linux and we don’t want any other operating systems installed, so we’re fine with wiping the disk.

Choose the disk to partition. And depending on your requirements, you can keep all of your data in a single partition (the default) or separate partitions for one or more of the top-level directories.
If you’re unsure, choose “All files in one partition”.

The installer will then give you one more chance to evaluate your disk configuration before making irrevocable modifications. After you click Continue, the installer will begin working and you will have an almost completed installation. So click on “Finish partitioning and write changes to disk”.

Click on “Yes” to finish the installation the disk.

Next, you can select the metapackages package to install.

Following that, you can choose which metapackages to install. The default options will install a typical Kali Linux system, so you don’t need to modify anything.
You can install the top ten most popular utilities on Kali by checking the sixth box. They are as follows:
1. Aircrack-ng
2. Burpsuite
3. Nmap (Network Mapper)
4. Metasploit
5. Wireshark etc.
You’re going to need one of these as a hacker sooner or later.
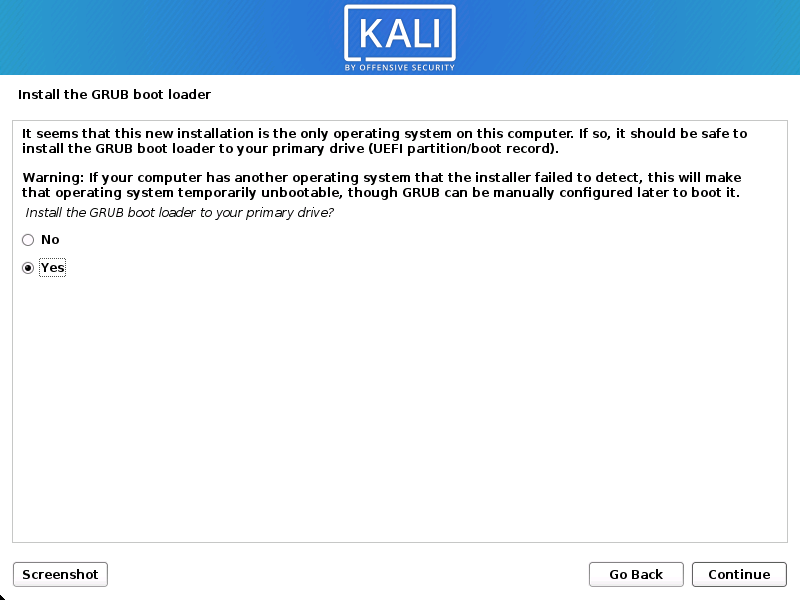
Then, validate the installation of the GRUB boot loader.

Finally, click Continue to reboot into your newly installed Kali Linux.

Conclusion
You may access a wide range of cybersecurity tools and resources by installing Kali Linux. You may successfully install Kali Linux on your computer, either as the primary operating system or in a virtual environment, by following these step-by-step instructions. With Kali Linux, have fun learning about penetration testing and cybersecurity!


